

Introduction
FFmpeg is a very powerful tool, which we have discussed earlier in our articles very well. It is used for streaming, transcoding and editing of video etc. So in this article we will see how to add subtitle in video using FFmpeg tool. It is very easy process a bit technical.
Where your video file can be any format because FFmpeg support almost every video format. So lets now follow the steps to do add subtitle video.
Steps To Add Subbtile In VIdeo Using FFmpeg Tool

Step 1
First of all you need to download & Unzip FFmpeg in your Computer. Use Link to Download FFmpeg Download. There are three versions available to download. In our case we are downloading the windows version. After successful download unzip the file and go to “bin” folder then copy ffmpeg.exe file.
Step 2
Now Make a new Folder on Desktop named as “Test” then paste ffmpeg.exe in “Test” folder.
Step 3
Now past your video clip in Test folder on which you want to add subtitle.
Step 4
Now make a Text file in Test folder and write down the following things in your text file as shown below in screen shot.
1
00:00:02,000 –> 00:00:6,000
Welcome To Headend INFO Channel.
2
00:00:07,000 –> 00:00:14,000
This is Testing Of Subtitles using FFmpeg Tool.

Step 5
Now save this Text file and give the name to it Subtitles.srt . We need to change it extension from .txt to .Srt .
Step 6
Now Create a new folder name as fonts in Test Folder. Then download a fonts.conf file from Here and paste it in fonts folder.
Step 7
Now make sure you are having these four things in your Test folder,

(a) ffmpeg.exe
(b) subtitles.srt
(c) headend.mp4 (our video file)
(d) fonts Folder (contains fonts.conf file)
Step 8
Now we need to define the Environment Variables. To define these variable you need to go to following path
Control Panel\System and Security\System
then click on left side below Advanced System settings now System Properties window will open.

Step 9
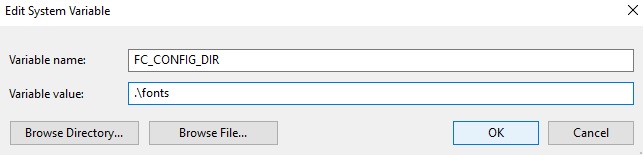
You need to go to right side below and click on Environment Variables . A new window will open where you need to add these three variables(by clicking on New…).
FC_CONFIG_DIR = .\fonts
FONTCONFIG_FILE = .\fonts.conf
FONTCONFIG_PATH = .\fonts

After adding click OK.
Step 10
Now open your Test folder then go to its explorer bar and type cmd then press enter. A command window will open. Which will show address like this,
C:\Users\Mandar\Desktop\Test
Step 11
So now type the following command after this address above mentioned address,
ffmpeg -i Headend.mp4 -vf subtitles=subtitles.srt Headendinfo.mp4
like,
C:\Users\Mandar\Desktop\Test\ffmpeg -i Headend.mp4 -vf subtitles=subtitles.srt Headendinfo.mp4
Then press enter.

Where,
-i = Input FIle
Headend.mp4 = Input Video FIle Name
Headendinfo.mp4 = Output File Name
Subtitles = Subtitle file name
Step 12
The above mentioned command is adding subtitle in Headend.mp4 file and creating new file named as Headendinfo.mp4 with subtitle.

Step 13
After completing the processing a new video file will be created automatically in Test Folder. In our case name of new file is Headendinfo.mp4 (with subtitle)
Step 14
Here is the result of output file with subtitle.


Now you can clearly see in above two screen shots there are two different subtitle at two different time as mentioned below,
” Welcome To Headend INFO Channel. “
” This is Testing Of Subtitles using FFmpeg Tool. “

Suggested Articles
reference : ffmpeg
![]()


